Outlook has an Import/Export wizard that makes it easy to import contacts from a CSV file.
Use a comma separated values file (CSV) to import your contacts into your Outlook on the web account.
Tip: For best results, make sure that the CSV file has UTF-8 encoding. This encoding works for all languages and alphabets.
Choose your version for instructions
The instructions are slightly different depending on whether you’re using the new Outlook on the web. Choose which version of Outlook on the web you’re using to see the steps that apply to you.
| IF YOUR MAILBOX LOOKS LIKE… | IF YOUR MAILBOX LOOKS LIKE… |
|---|---|
 See Instructions for the new Outlook on the web. |  See Instructions for classic Outlook on the web. |
Note: If your organization has included its logo in the toolbar, you might see something slightly different than shown above.
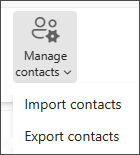
Instructions for the new Outlook on the web
- At the bottom of the page, select
 to go to the People page.
 - On the toolbar, select Manage > Import contacts.
- Select Browse, choose your CSV file, and then select Open.
- Select Import.
Note: If the file doesn’t have UTF-8 encoding, the import tool may not recognize and display all text correctly. The import tool will then show you some example contacts from your file, and you can check that the text is readable and correct. If the text is not displayed correctly, select Cancel. You will need a file in UTF-8 encoding to continue. Convert your CSV file to use UTF-8 encoding, and restart the import. To learn more about UTF-8 encoding, see Why should I care about UTF-8 encoding?
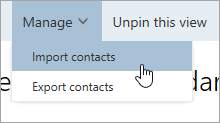
Instructions for classic Outlook on the web
- At the bottom of the page, select
 to go the People page.
 - On the toolbar, select Manage > Import contacts.
- Choose any of the email services listed. It doesn’t matter which service you choose, as you’ll import your contacts from a CSV file in the next step.
- Select Browse, choose your CSV file, and then select Open.
- Select Upload.
Note: If the file doesn’t have UTF-8 encoding, the import tool may not recognize and display all text correctly. The import tool will then show you some example contacts from your file, and you can check that the text is readable and correct. If the text is not displayed correctly, select Cancel. You will need a file in UTF-8 encoding to continue. Convert your CSV file to use UTF-8 encoding, and restart the import. To learn more about UTF-8 encoding, see Why should I care about UTF-8 encoding?
Why should I care about UTF-8 encoding?
Typically, you can import contacts without worrying about the underlying details of how the text is stored in the CSV file. However, if the contact information includes characters not found in the English alphabet, such as Greek, Cyrillic, Arabic, or Japanese characters, this can cause problems when importing contacts. Therefore, you should save the contacts file with UTF-8 encoding if you have that option during export.
If you can’t export your contacts using UTF-8 directly, you can convert the exported CSV file using Excel or third-party apps. How to do this will be different between apps and app versions.
How to convert your CSV file to UTF-8 using Microsoft Excel 2016:
- In Excel, create a new blank document (workbook).
- From the Data menu, select From Text/CSV. Browse to your exported CSV file (you may have to select to display Text Files (….csv) to see it). Select Import.
- In the dialog box that appears, under File Origin, choose the encoding that makes the characters in the text appear correctly, for example, Cyrillic Windows 1251, and then select Load.
- Check that characters are displayed correctly in Excel.
- Select File >Save As. Enter a name for your file, and select CSV UTF-8 (Comma delimited) (*.csv) as your file type.
- Select Save.